The Thing In My Pipes – Editing

Okay, so the last hurdle of this project, editing.

I separated each scene of the Animation into different photoshop files and folders to save myself the horrible fate of having probably thousands of layers in a single file.

files bitches

I then exported each of the scenes into GIF files, which I then imported into Premiere Pro.  But not everything was that simple.  In the Photoshop timeline, I had taken great care to set each frame’s duration to make the animation play out as I intended, but when I exported it to a GIF file, the duration of each frame was lost and each frame became the same duration, and very fast, so fast, in fact, that a lot of the frames were lost.  I tried playing my animation in the Photoshop timeline and recording my screen, but I couldn’t get the screen recording software to work.  I tried rendering the animation as an mp4 file, but after over an hour of waiting on attempts, for about a 5-second video, I realised that it wasn’t happening.

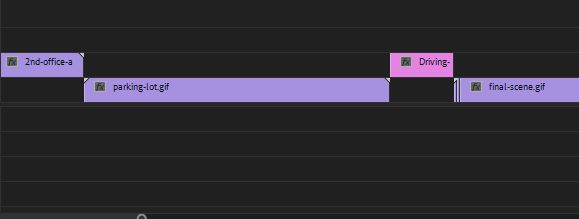
For some reason, all of the gifs had exported and become gifs that I can play on my computer, on WordPress, and everything looks fine, and I can export them into Premiere Pro, and everything is reasonably fine, except for the driving gif that, for a reason that I can’t figure out, doesn’t register on Premiere Pro as a gif, and is just a single image.  All of the options are, as far as I can see, exactly the same.  I’ve exported it about a dozen times, thinking that it must have just been a fluke or a glitch, but no.  I can’t figure out why this is happening.  Here’s what it looks like in Premiere Pro.  the purple bits are the gifs that work, and the pink one is the driving one that isn’t working.

i hate this shit

I can’t find any way of just exporting the whole frame animation as a png or jpeg sequence, is that too much to ask Photoshop?!?!

I thought of screenshotting all of the hundreds and hundreds of frames and then importing them into Premiere Pro as an image sequence, which would turn them into a video, but then I realised that due to screenshotting being done by hand, the shots wouldn’t all be exactly the same size and would, therefore, cut off some of the image, which I imagined would make for a very jerky video once imported to Premiere Pro.  So, as of the time of writing this, I’m not sure what to do, to be honest.  I probably should have just used Adobe Animate to make the whole thing, but oh well, it’s done now.  :/

Oh yes!!  I think I’ve solved it!  I was looking through the render video settings and I found a setting called photoshop image sequence, which is exactly what I’ve been wanting!  I’ve never seen anything more beautiful.

image sequence heaven

I take that statement back, this next image has trumped it.

beautiful

I made an image sequence of the driving since, which is 42 frames long.  For some reason, however, it only exported 33, and the frames themselves had lost the right aspect ratio, so everything is squished and blurry.

Driving13

Maybe I need to play around with the image sequence render settings.

I think I’ve found one of the problems.  I set the size to this.

no

Whereas I think it needs to be this.

yes

I’m also going to change the framerate from 24fps to 10fps to see if that makes a difference to the loss of frames.

Weirdly, setting it to 10 frames per second was even worse, I now only have 13 of the original 42 frames.  And it’s still just as blurry, but at least it’s not squished now.

Driving06

I found this website https://ezgif.com/gif-to-mp4 which allows one to convert gif files to mp4 files.  I did this with the driving scene, and it seems to work!  Finally something that actually works!!!  But it still doesn’t fix the problem of the video being the wrong speed.

My faboulous friend Louise told me about some screen recording software called OBS Studio https://obsproject.com/

Using this, I was able to record my screen when watching my animations play in the photoshop timeline and it worked!!  I’m so happy right now.  Here are my screen recording files.

goodess

This is what they look like in the premire pro timeline.  It’s such a beautiful sight to see.  It’s almost 4 minutes long.

it is beauty it is grace, i want to suck its face

When I recorded my screen, it wasn’t in completly full screen so it looks like this.

not nice

So I clicked this, which allows me to reposition the video.

nice

Then I spent a long time going through the video and adding sounds and voice lines and what not.  I got all of the sounds and music from https://freesound.org/

This is what the timeline of the completed animation looks like in Premiere Pro.

FINAL SCREENSHOT BITCHES

AND ITS DONE!!  MY FMP IS FINALLY COMPLETE!!!!

I’m so pleased to have finished it that I’ll make a blog post dedicated to the video itself.

The Thing In My Pipes – Animatic

For the Muybridge animation, I made last year I made an animatic where I animated the movements I drew out in the storyboard, but as I’m stuck at home, I don’t have access to adobe after effects, so I will have to make do with just showing each static storyboard.

I had to go onto each scanned storyboard and individually screenshot all of the 93 shots.  Here is a selection of them in my Onedrive.

file gore.JPG

I imported all of those files into Lightworks, which is a free video editing program I use.  I then cut up the single video that Lightworks automatically put all the images into, so that I can see where each shot starts and stops, then I put the shots into a pattern I learned from Lewis, my film class teacher taught me.  This method of organising video and audio makes it easier to differentiate shot from shot, instead of it just being one long line.

shot gore.JPG

After much stress, I understood that Lightworks isn’t as good as I thought it was, and is very stressful trying to edit in the way I want to edit, so I’m ditching it and started a free trial on Premiere Pro.

Here’s the Premiere Pro pattern of video clips.

shot gore.JPG

I go on to https://freesound.org  which is my go-to place for free sounds to use in my projects.

I got my friend Alex to voice act Charlie, which is the name I gave to the thing in the toilet.

Here’s what it looks like in Premiere Pro.

Animatic gore.JPG

After a full day of downloading dozens of sounds on freesound I’ve finally finished it!!  Yay!  (go to the top for the finished video).


3D Spaceship Animation

We were given the task of modelling a spaceship from one single cube in Autodesk Maya.  So, knowing me, after a couple of hours of messing around, I created a spaceship, that if actually spotted flying around the skies in real life, would cause bystanders to think they had eaten too many strange-looking mushrooms.

I now present to you

THE PIGEON-MOTHER-SHIP.

Screen Shot 2019-09-24 at 12.37.21Screen Shot 2019-09-24 at 12.37.29

Modelling


Unfortunately I whilst I was crafting this glorious monstrosity, I was so immersed in it that I forgot to take screenshots of my progress, so this is basically how I made her.

I selected the face option, then used the extrude tool to make everything you see that is sticking out in some way.

Screen Shot 2019-10-01 at 13.24.12

Screen Shot 2019-10-01 at 13.24.24

To make the freakishly long neck, I extruded the front of the then-plain-and-boring-ship and used the move tool to move it up, and the rest is history.

Screen Shot 2019-10-01 at 13.41.20.png

I used the scale tool to change the size of the wings.

Screen Shot 2019-10-01 at 13.51.21.png

And then these are all of the materials I assigned to different parts of my cursed creation to give it colour.  The material lambert basically means that it is not matte, it’s not shiny, then Blin means that it is shiny and reflective.  I renamed the lamberts so that I knew what I was looking at, but I guess that I forgot to rename the Blins… oh well.

Screen Shot 2019-10-01 at 13.42.17.png


Animation


Once we had created our masterpieces, we were given a whole 3D city to mess around in, and given the task of animating a 10-second sequence of the ship flying around.

Screen Shot 2019-09-24 at 13.16.53.png

I decided that I wanted to make the technologically-enhanced-pigeon to use a road like a run-way, then take off and swerve between the skyscrapers, then fly high into the sky, and fall back down to earth and crash into a building, then try and make some kind of explosion.  I soon realised that I had planned a lot of stuff that would be hard to realistically animate, but I continued anyway.

I drew out a very simplified version of my idea.

img_20191001_141145.jpg

So I placed my majestic ship on one of the many roads and set a keyframe by recklessly pressing the “S” key (sorry Kieran), then moved the ship along the road on the X-axis, and made a keyframe.

Screen Shot 2019-10-01 at 13.58.27.png

 Then I moved the ship to the end of the road, and on the Y-axis, lifted her up into the sky, and made yet another keyframe.

Screen Shot 2019-10-01 at 14.21.36.png

I then continued moving the mechanical pigeon in the general plan that I drew out, setting keyframes at mostly regular intervals of 20 frames.  These are all the keyframes of the general outline of the animation.

Screen Shot 2019-10-01 at 14.24.49.png

It was at this point that I realised that I had not only been disobeying the brief (making a spaceship take off and fly around, instead of just making it land), but I had also made plans for a way too ambitious animation than my current skillset, and the allotted time allows for.  So, I’m just going to make a simple animation of the spaceship coming in for a landing on the top of a building.  I started by making the spaceship come in for a simple landing, and made it wobble, trying to make it look more realistic.  I tried to find a reference video of a spaceship landing, but I couldn’t.  I then storyboarded the shots that I wanted.

IMG_20191110_182941.jpg

I separated the shots into different cameras, then made them and placed them where I wanted them.  This is them in the outliner.

Screen Shot 2019-11-11 at 10.39.35.png

I followed Kieran’s video about how to render a scene in Maya.  youtube.com/watch?v=ojRK62M8QvM&feature=emb_logo

I went through this process 3 times, one for each of the cameras.

I then put all the shots in Premiere

Screen Shot 2019-11-12 at 12.38.14.png

Then I edited them to make the shots flow better together, and added sounds to make it more enjoyable.

This is the final result!