

Animation
How To Make An Animatic
- Select jpeg on the scanner.
- Import storyboard into Photoshop as a jpeg.
- To rotate the image if needed, go to Image, then Rotate, then rotate however much you want.
- Use the rectangular marquee tool, and select one of the panels.
- Press CMD J which makes the selection its own layer.
- Make each panel its own layer, but don’t put the layers into folders, because it messes up in After Effects.
- If there are parts that I want to animate later in After Effects, then make them into a new layer and organise the layer behind the original layer, and replicate everything on it.
- Name each panel, like Panel 1, Panel 2, Panel 3, etc.
- Press CMD L to bring up the levels windows, which you can use to make the pictures brighter or darker.
- Using the Brush Tool, you should add colour to it, but only black, grey and white tones. Can also add more definitive lines.
- Import it into after effects.
- Create a new composition called master.
- Create a new composition for each layer.
- Make simple animations for each storyboard picture, like rotating a ball or what not.
- Play around with the camera on the storyboards.
- Line up the pictures in their respective order in the master, so that when one picture finishes, the next one starts.
- Can add sounds
Robot Animation
Today we were given the task of making a 2D robot run across the screen a couple times.
So first of all, I had to design my robot in Adobe Illustrator, but I couldn’t think of a cool design. I then remembered a drawing that I and my Girlfriend had made, of a humanoid being controlled by a Furby inside of them. So I began drawing inspiration from googling pictures of Furbies and different types of robots. Here are the pictures that inspired me the most.


So I started off by designing my Robot. I tried to make him seem kind of lanky and tall, giving him a youthful air. I exaggerated this aim with those cute little booties. For animation purposes, I made each limb into its own group in illustrator, before I put it into Animate. I wanted him to look slightly sad, giving him a little slouch; as if he isn’t too happy about being controlled by a Furby.

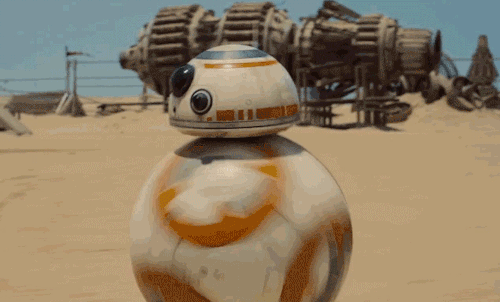
I added balls at every joint so that it would look more realistic if he were to wildly move his limbs around. I imagined the movement being kind of like how BB-8 moves from Star Wars
Because none of my animations can ever be straightforward, I then made a simple background in Illustrator for my little robot guy to run in.
I imported them into the Stage in Animate, and made each grouped limb into its own symbol, and also made the whole robot into a symbol as well. This would allow me to animate each limb individually. Making the whole robot into a symbol allows me to move the robot and all of its animations at once on the main stage. I quickly made up a naming convention for my symbols, so that I could easily tell one from the other. It was as follows; Limb_Left/Right_Top/Bottom.

I then came up with the dumb idea to have the robot be chased by a mob of sentient Furbies. I figured a cool story could emerge out of this little scene. What story is that you probably didn’t ask? Well, the answer that you probably don’t want is That I have no idea, I just thought that this was a short little interesting bit of narrative. So I then made four Furbies and made each one into a symbol, as you can see above.
So I double clicked on my little robot boy, which made it so that I was animating the robot and nothing else. I selected the Bone tool, which allows me to create the “bones” of an illustration. I clicked on the top of his chest, then dragged out to the head. Then I continued dragging and making these points for each limb.

These are what allow you to animate specific limbs. You could just move the limbs independently, and animate that way without the bone tool, but this tool is very useful because it makes sure that the limbs are confined to the movements of an actual limb, like for example it makes sure that your head can’t fly away into the night’s sky.

When you use the bone tool to make the moveable limbs, it automatically creates an “Armature” layer on the timeline. This layer holds all of the bones. It also has green frames, to help you discern it from the other types of layers.

Next, I started actually animating the little robotic chum. I positioned him in a running stance (pictured above). Then I copied and pasted the same keyframe about 20 frames later, then in the middle of my two keyframes, at around 10 frames, I made a keyframe and positioned my little robot fellow into a running stance which made him look like he had already run a bit.

I made the left leg extend to the right, and the right leg extend to the left, and so on. This made it look like my little robot acquaintance was running on the spot. Yay! This is what the timeline looked like.

I then copied and pasted these three frames about 20 times, so that he kept doing his little run cycle for the foreseeable future, which gave me the time to mess around with the animation for about 400 frames. I went back to the main stage, and on the little robot guy’s layer made a keyframe at frame 1, and made one at about 70 frames later. At frame one I positioned him just off the digital canvas to the left, then I shifted my red timeline slider thingy to the second frame. Holding down shift, I moved the robot across the canvas and left it just off the canvas to the right. I then created a Classic Motion Tween between those two frames.
![]()
Because I had already animated his run cycle in his symbol, this made him run across the screen! Whoop!
I then did the whole of the last step again, but instead of making him from left to right, I made him run from right to left. This made him run across the screen twice!
Next, I animated my little cute, but equally terrifying Furbies. I gave each Furbie their own layer.

Then I did the exact same thing I did with the robot but made sure that they ran across the screen in the time when the robot was off-screen. I also made the distance between their keyframes different, so that their movement would look slightly more authentic, as in they all wouldn’t just float across the screen all at once, at the exact same pace.
And Ta Da!! I now had an animation where a robot ran across the screen, which was being chased by a mob of terrifying Furbies! 😀
I then went home, and wowie, surprise surprise, messed around with it in the editing software, Lightworks. I added some fitting sounds that made it more interesting, which I found on Freesound. I also gave the whole shebang some fancy fade effects.
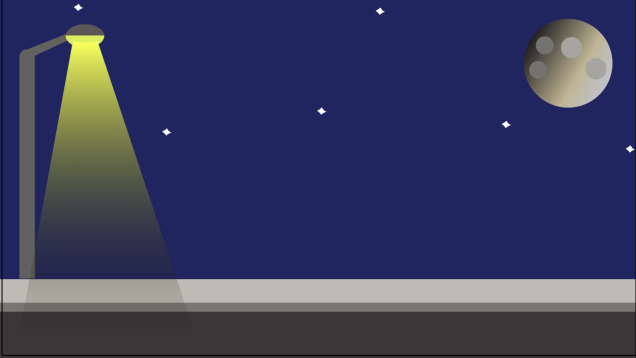
Something my teacher told me after I’d made it was that I could have made the light flicker, and the stars twinkle, which would have given the animation a lot more depth, so that it didn’t look so 2D and flat. It’s the little details that count.
FUTURE ME! REMEMBER THIS TECHNIQUE FOR FUTURE ANIMATIONS!!
Anyway, hope ya enjoy 🙂
I Have A Dream Animation
Today I learnt how to animate words in Adobe After Effects. We were given the task of putting on-screen lyrics to a Martin Luther King speech.
We were given a pre-made composition with the audio, and the first part of the speech already animated. We dragged out a text box with the Text tool and wrote each word in the speech in their own dinky little text box.

We then arranged the words into a visually appealing format on the screen with the Move tool.

Then we manipulated the words’ properties, like position, scale, rotation and what not. I animated the words so that they would fly onto and off the screen by clicking the position stopwatch, then creating keyframes at the specified places.

The keyframes are represented by those cute little white diamond shapes down there. I then chose when I wanted the Words to appear and when I wanted them to disappear by holding “Alt” and pressing the “}” key. This trimmed it to the place I wanted it on the timeline.

This is how it looked when I’d finished it.
Here’s the final product! Yay!
Chico and Rita Review
1: What did Javier Mariscal give to the director Fernando Trueba as the starting point for the animated film Chico and Rita? in 2007, Javier Mariscal gave his sketchbook from his trip to Cuba to Fernando Trueba, the director of Chico and Rita. The colourful drawings within it clearly show a passionate love for the architecture and interiors of Cuba. Looking at some of the art, you can almost see the beginning of the ideas for Chico and Rita.
2: This is Fernando Trueba first animated film. What was he surprised to be working with? As this was Fernando Trueba’s first animated film, he had assumptions about animation; he thought that he would only be working with drawings, and animated characters, but to his surprise, he actually collaborated with real-life actors.
3: What are the benefits of working this way? He realised that working with actors “is a really good idea because it’s the best way to keep the film under control”, otherwise when the director tells the animator to make something, there could be a million different outcomes. Working with actors allows the director to make exactly what they want, so then when the animators come to animating the sequences, there is no deviation from the director’s original cinematic vision.
4: Why did the director feel it was important to use Cuban people? To represent the Cuban characters more accurately.
5: Where was most of the film filmed and how and what was filmed differently? Almost all of the film was filmed on set, except for exterior shots with cars and such. But when filming outside, they had to make sure that everything was “Marked up”, which involved putting striped balls on everything, so that they could go back and digitise all of the camera movements.
6: How many animators worked on the film? Around 200 people.
7: What was their biggest challenge? Making the 200 animators seem like just one person because they all needed to draw in the exact same style for continuity in the film.
8: What locations are described as also ‘the star of the film’? Havana and New York.
9: How did Javier Mariscal visually record Havana? By drawing the backdrops and backgrounds in great amounts of details. They evoked the characters, the feeling of Havana, and New York.
10: How does colour support and enhance the story in the film? Two different colour palettes are used for Havana and New York. Havana has very warm colours, with lots of sunshine, and New York has much more muted colours, with rain and shadow. This makes it easier to distinguish one place from the other.
11: What other story does the film try to tell? The story of all of the other Cuban musicians at that era. How they moved to New York and influenced Bebop there.
12: Why did the director decide to recreate the music rather than use the existing original recorded music? They were going to use the original music, but then Fernando Trueba realised that musically speaking, it would turn the film into some kind of compilation disc. Instead, he was much more excited at the idea of recreating the music for real, by “getting the musicians to play other musicians.” He wanted an original, contemporary produced soundtrack.
Rotoscoping
The animation technique used in Chico and Rita is called “rotoscoping”. It is where the animator uses a pre-recorded piece of real-life video, with real actors, then they trace around them on every single frame. This allows them to artistically, but accurately translate the video into an animation.
Javier Marisca
He is a Spanish Artist, Designer and Director. Among his best-known works are Cobi, the mascot for the 1992 Olympic Games in Barcelona. One of these latest works is Chico&Rita (2010), an animated film directed together with Fernando Trueba. The film was nominated for an Oscar and received the Goya award for the best-animated film.
Task 1.5 – Animation Art style Moodboards
Here are a bunch of animation art style mood boards from a small selection of games, films, animations and music videos that inspire me. They are for my research on what I want my upcoming Muybridge animation to look like.
A Monster Calls (Film)


Don’t Starve (Game)


Sally Face (Game)


Otis Stacks – Fashion Drunk (Music Video)


Stuck In The Sound – Let’s Go (Music Video)


Siames – The Wolf (Music Video)


Homestuck – (Web Comic/Game)


Task 1.1 History of Animation Timeline
Shahr-e Sukhteh (3,000 B.C.)
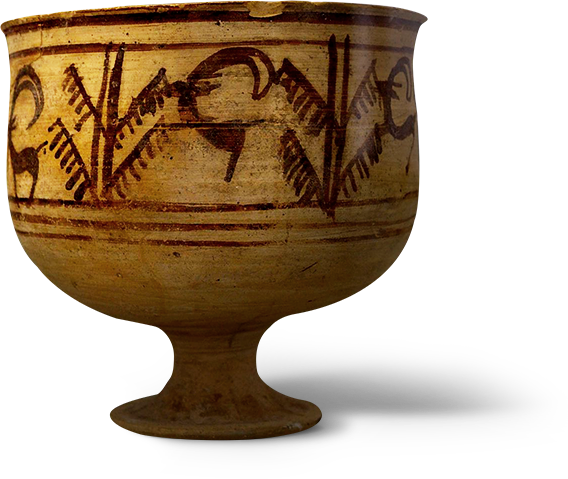
The earliest concept of animation known is this pottery bowl made in the bronze-age. It depicts a handful of drawings of a leaping goat. Although these are very simple drawings, presumably when the bowl was spun it would give the goat the illusion of simplistic motion.
It is truly insane to think that this little bowl is the great ancestor of all animation.
Magic Lantern (1603)
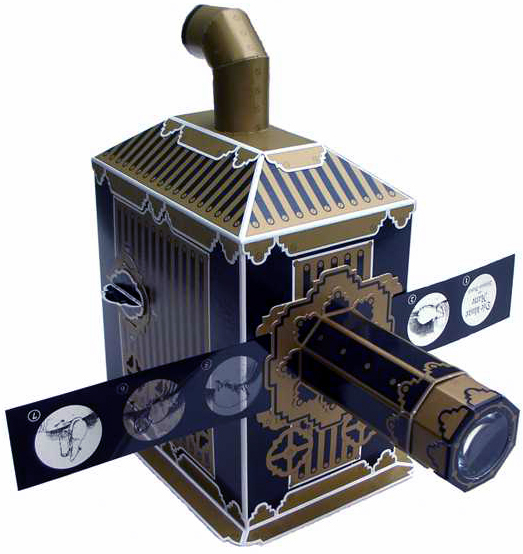
It was invented by the Dutch scientist Christiaan Huygens. The projection was originally lit by candlelight. It used the candlelight behind the hand-drawn glass slides to project the image onto a wall, through one or more lenses. This was a significant leap in the progression of film and animation.
Thaumatrope (1824)

It was invented by the English physician John Ayrton Paris.
The Thaumatrope is a Victorian toy made from a simple card disk, featuring a picture on each side. This is attached to two pieces of string, and when the strings are twirled rapidly, the card rotates on its axis and the two images appear to combine into one picture. It was the first invention to exploit the persistence of images on the retina.
Phenakistoscope (1832)

It was invented by the Belgian physicist Joseph Plateau. But by a complete coincidence a couple of weeks later, Simon von Stampfer in Berlin created an identical invention and named it the Stroboscope.
It was operated by spinning the cardboard disc and looking at the reflection of the image in a mirror, through a series of moving slits. Through the distortion and flicker, the disc created the illusion that the image was moving.
Originally marketed as just a children’s toy, the Phenakistoscope is widely considered to be the very first form of animation, which would go on to eventually inspire the creation of films and the modern film industry.
Joseph Plateau (1801 – 1883)

In 1832, Plateau created an early stroboscopic device, the “phenakistoscope”, the first device to give the illusion of a moving image. It consisted of two disks, one with small equidistant radial windows, through which the observer could look, and another containing a series of images. When the two disks revolved at the correct speed, the synchronization of the windows and the images created an animated effect. The projection of stroboscopic photographs, creating the illusion of motion, eventually led to the creation of cinema.
Plateau also studied the phenomena of capillary action and surface tension. The mathematical problem of existence of a minimal surface with a given boundary is named after him. He conducted extensive studies of soap films and formulated Plateau’s laws which describe the structures formed by such films in foams.
Zoetrope (1834)
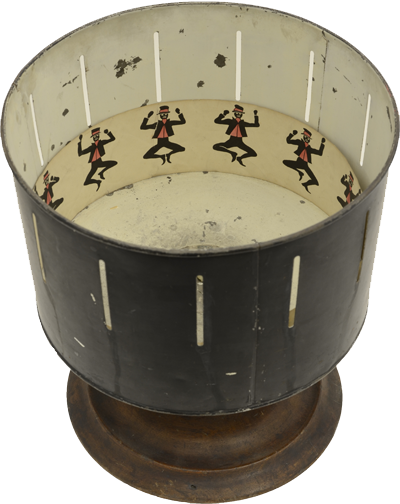
It was invented by the British Mathematician William George Horner who originally named it the Daedalum, which translates as “wheel of the devil”. but Pierre Desvignes, a French inventor, renamed his version of it the zoetrope (from the Greek word root zoo for animal life and trope for “things that turn.”)
Because of its old vintage heritage, the jittery moving picture can be seen as a bit eerie, which is why it was used in a scene in the film The Woman in Black.
The zoetrope consists of a cylinder with slits cut vertically in the sides. On the inner surface of the cylinder is a band with images from a set of sequenced pictures. As the cylinder spins, the user looks through the slits at the pictures across. The scanning of the slits keeps the pictures from simply blurring together, and the user sees a rapid succession of images, producing the illusion of motion.
William Horner (1786 – 1837)
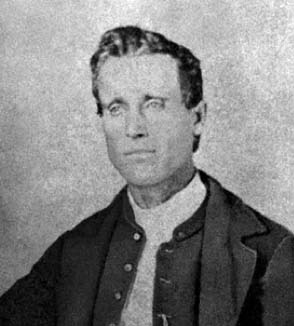
He was the inventor of the historical Zoetrope, but he was also a British mathematician; he was a schoolmaster, headmaster and school keeper, proficient in classics as well as mathematics, who wrote extensively on functional equations, number theory and approximation theory, but also on optics. His contribution to approximation theory is honoured in the designation Horner’s method, in particular, respect of a paper in Philosophical Transactions of the Royal Society of London for 1819.
Flip-book (1868)

It was invented by John Barnes in 1868, who named it the Kineograph. The basic idea was creating using a booklet with a drawing which moved when the pages were flipped. The idea didn’t really catch on though until 1882 when Henry Van Hoevenbergh created an American version in combining the work of John Barnes and the photographer Eadweard Muybridge to create a moving image using a booklet that was flipped.
Praxinoscope (1877)

It was invented by the French inventor Charles-Émile Reynaud. It was essentially a new and upgraded take on the zoetrope, as it used a strip of pictures placed around the inner surface of a spinning cylinder. It improved on the zoetrope by replacing its narrow viewing slits with an inner circle of mirrors, which were placed so that the reflections of the pictures appeared more or less stationary in position as the wheel turned. Someone looking in the mirrors would, therefore, see a rapid succession of images producing the illusion of motion, with a brighter and less distorted picture than the zoetrope offered.
Charles-Émile Reynaud (1844 – 1918)

was a French inventor, responsible for the praxinoscope (an animation device patented in 1877 that improved on the zoetrope) and the first projected animated films. His Pantomimes Lumineuses premiered on 28 October 1892 in Paris. His Théâtre Optique film system, patented in 1888, is also notable as the first known instance of film perforations being used.
Zoopraxiscope (1879)

Invented by the great photographer and pioneer of early cinema, Eadweard Muybridge. The Zoopraxiscope (earlier known as the Zoogyroscope) was essentially a projecting version of the earlier Phenakisticsope or ‘spinning picture disk’. The device projected sequences of images from glass discs and was invented in order to prove the authenticity of Muybridge’s famous galloping horse pictures. The earlier Zoogyroscope took the 16-inch discs while the latter Zoopraxiscope took the 12-inch discs.
Thomas Eddison (1847 – 1931)

He is known as America’s greatest inventor. He created many devices in the areas of Mass communication, sound recording, electrical power generation and motion pictures. But he also invented the Kinetoscope.
The Kinetoscope is an early motion picture exhibition device. The Kinetoscope was designed for films to be viewed by one individual at a time through a peephole viewer window at the top of the device. The Kinetoscope was not a movie projector but introduced the basic approach that would become the standard for all cinematic projection before the advent of video, by creating the illusion of movement by conveying a strip of perforated film bearing sequential images over a light source with a high-speed shutter.
The Lumière Brothers. Auguste (1862 – 1954), Louis (1864 – 1948)
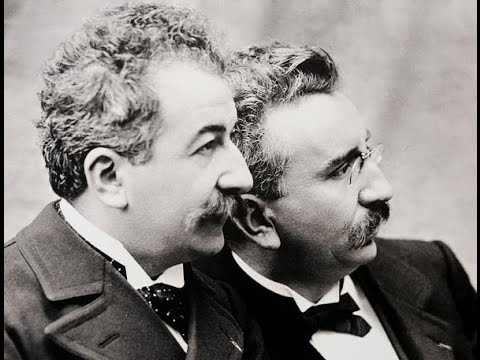
They were among the first filmmakers in history. They patented an improved cinematograph, which in contrast to Thomas Edison’s “peepshow” kinetoscope allowed simultaneous viewing by multiple parties.
They created the first ever motion picture film in history, which was called “Arrival of a Train at La Ciotat” (1895). It depicted a steam engine train arriving at a station. It was so much more realistic than what anyone had ever seen before. When they first showed it to an audience, it was so realistic that they screamed, because they thought that an actual train was about to run them over.
Although revolutionary, it was mainly seen as just a gimmick at this time. At one of these showings, it just so happened that George Melies was in the audience. This greatly affected him, and inspired him to leave his magician career behind, and start making films instead.
Humorous Phases of Funny Faces (1906)

It is a short silent animated cartoon directed by the British-American film producer James Stuart Blackton and is the first entirely animated film using stop motion photography to create movement. It depicts a series of scenes with a handful of caricatured characters. It is clearly a fun exploration of the then new tech.
Fantasmagorie (1908)

The title “Fantasmagorie” is French for “A Fantasy”. It was directed by the French cartoonist, Émile Cohlis. It was the first animated film using hand-drawn animation and is considered by film historians to be the first animated cartoon. The film, in all of its wild transformations, is a direct tribute to the by-then forgotten Incoherent movement. The title is a reference to the fantasmograph, a mid-Nineteenth Century variant of the magic lantern that projected ghostly images that floated across the walls. It is a very creative animation, where objects transform into other objects smoothly. It seems to be an experiment into what this then-new technology could achieve.
Gertie The Dinosaur (1914)
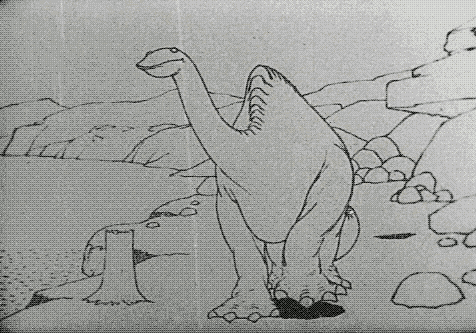
Created by the American Animator and cartoonist Winsor McCay. This animation is considered to be the first animated film to feature an appealing character. This shows that these early animators were starting to understand how to present animated characters to audiences, in a way that would make them like, and relate to the characters more.
Felix The Cat (1919)

Felix made his first appearance in Feline Follies, which was directed by the American Cartoonist Otto Messmer. many Felix The Cat films were made, which went on to make him be considered as the first animated movie star.
Steamboat Willie (1928)

It was created by Walt Disney and was one of the first appearances of Mickey Mouse, who went on to become one of the most iconic animated characters in history. “If you can dream it, you can do it.” – Walt Disney. Steamboat Willie is known for being the first cartoon with sound printed on the film and was the first notable success for Walt Disney Studios, which was founded in Los Angeles in 1923.
Walt Disney (1901 – 1966)

He was an American motion-picture and television producer and showman, famous as a pioneer of animated cartoon films and as the creator of such cartoon characters as Mickey Mouse and Donald Duck. He also planned and built Disneyland, a huge amusement park that opened near Los Angeles in 1955, and before his death, he had begun building a second such park, Walt Disney World, near Orlando, Florida. The Disney Company he founded has become one of the world’s largest entertainment conglomerates.
Merry Melodies (1931)

Warner Bros was founded in 1930, and in 1931, they began producing the Merry Melodies, and Looney Tunes, which featured the classic animated characters; Bugs Bunny, Daffy Duck, Porky Pig and Elmer Fudd. These cartoons were a major step in animation for the world; animation was starting to become a major source of entertainment for the masses.
Snow White and The Seven Dwarfs (1937)

It was created by Disney, and at the time was revolutionary, because it was the first fully animated, hand-drawn feature film. It was a visual exploration of the classic fairy tale by the Brothers Grimm. It went down in cinematic history as one of the animated classics. The animated film set in place a new format of feature films that would go on to become one of the biggest methods for producing films.
The Flintstones (1960)

It was produced by the American animation studio, Hanna-Barbera. It was the first ever fully animated cartoon series to appear on prime-time television, and it marks the start mass produced cartoons for generations to come. It was about a family of cavemen living in stone-age suburbia.
Fritz The Cat (1964)

Created by the American Director, Ralph Bakshi. It was the first ever adult X-rated animated feature film to be released. This film rather graphically illustrated that cartoons don’t always have to be for children.
The Simpsons (1987)

Created by the legendary American cartoonist, writer, producer, animator, and voice actor, Matt Groening. The Simpsons is an American adult sitcom that has earned the impressive titles of being the longest-running American sitcom, the longest-running American animated program, and the longest-running American scripted primetime television series. By now, cartoons were one of the main forms of digital entertainment and were happily accepted as the norm.
Javier Mariscal (1950 – Present)
He is a Spanish Artist, Designer and Director. Among his best-known works are Cobi, the mascot for the 1992 Olympic Games in Barcelona. One of these latest works is Chico&Rita (2010), an animated film directed together with Fernando Trueba. The film was nominated for an Oscar and received the Goya award for the best-animated film.
Jamie Hewlett (1968 – Present)

He grew up drawing every second that he could. He attended multiple art schools but got rejected from Kingston Polytechnic because he had an argument with his interviewer. At the age of 20, he created the comic series Tank Girl. It was a huge success. Hollywood killed tank Girl, and he did a series of odd jobs for a couple years. During his Tank Girl rein, he met several famous musicians, who were fans. One of these was Damon Albarn. In 2001, they started the massively popular band Gorillaz. Over the course of the next decade, his distinctive art style helped to make Gorillaz a pop culture icon.
Matt Groening (1954 – Present)

Is an American cartoonist and animator who created the comic strip Life in Hell, and the television series The Simpsons and Futurama.
Growing up in Portland, Oregon, Matt Groening did not particularly like school, which is what originally turned him towards drawing. In the mid-1980s, he moved to Los Angeles and started drawing a comic strip named “Life in Hell”, which eventually became published in the newspaper where he worked. In 1988, James L. Brooks, looking for a filler in the television show, The Tracey Ullman Show (1987), turned towards a framed “Life in Hell” strip on his wall and contacted Groening. The animated shorts that Groening created were The Simpsons (1989).
Seth MacFarlane (1973 – Present)

Born in Connecticut in 1973, Family Guy creator Seth MacFarlane began working in animation in the mid-1990s. He debuted his first animated show Family Guy in 1999. It was cancelled in 2002 but brought back in 2005 because of widespread demand. Since then, MacFarlane has developed other animated series American Dad! and The Cleveland Show. In 2012, he released his first live-action feature film Ted and was picked to host the 2013 Oscars.
Research
https://publicdomainreview.org/collections/phenakistoscopes-1833/
https://history-of-animation.webflow.io/
https://reelfocus.blogspot.com/2015/04/zoetrope-and-zoopraxiscope.html
https://whatis.techtarget.com/definition/zoetrope
https://prezi.com/6ziwzr97ncmi/the-history-of-animationthe-flipbook/
https://www.revolvy.com/page/Praxinoscope
https://www.kingston.gov.uk/info/200246/museum_collections_and_exhibitions/539/eadweard_muybridge/3
https://www.kingston.gov.uk/info/200246/museum_collections_and_exhibitions/539/eadweard_muybridge/3
https://en.wikipedia.org/wiki/Humorous_Phases_of_Funny_Faces
https://en.wikipedia.org/wiki/Merrie_Melodies
http://www-groups.dcs.st-and.ac.uk/history/Biographies/Plateau.html
https://en.wikipedia.org/wiki/Joseph_Plateau
https://en.wikipedia.org/wiki/William_George_Horner
http://www-history.mcs.st-and.ac.uk/Biographies/Horner.html
https://en.wikipedia.org/wiki/Thomas_Edison
Hugo (2011)
https://en.wikipedia.org/wiki/Walt_Disney
https://www.britannica.com/biography/Walt-Disney
https://www.britannica.com/biography/Matt-Groening
https://www.biography.com/people/seth-macfarlane-20624525
https://www.imdb.com/name/nm0004981/bio?ref_=nm_ov_bio_sm
Masking Animation
Today I learnt how to animate a moving pencil making a line as it goes.
Right off the bat, I decided that I didn’t want to make a pencil. So I made my alternative artwork on Adobe Illustrator and imported it into Adobe Animate.

I then made the hand into a symbol.
I then added a Classic Motion Guide to the symbol. These allow you to draw the path that you want your symbol to follow.

This is what it looked like.

I selected the pen tool, with the ink option because I wanted a somewhat smooth line.


I proceeded to draw a spectacular continuous line drawing.
I placed the pivot point in the tip of the finger so that the finger would follow the line, not the middle of the forearm.
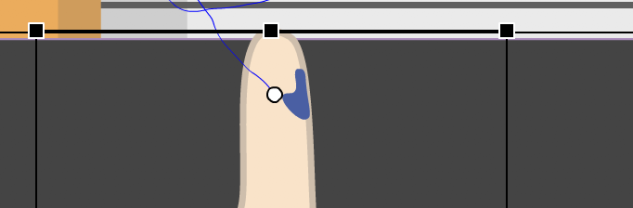
I created about 70 frames, and added a Classic Motion Tween to that bad boy, then moved the red slider on the timeline to the end, and placed the hand on the end of the line, and it snapped to it, creating a keyframe.
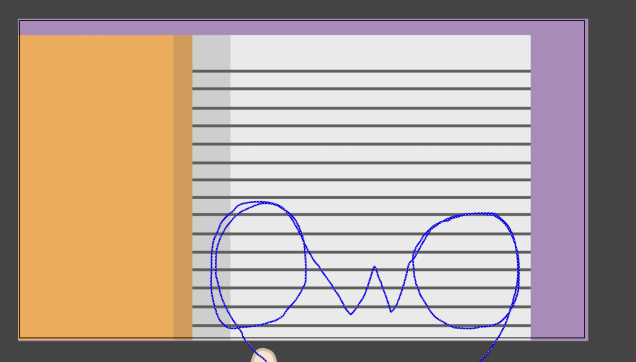
When I played the animation, the hand followed the OwO, finger first. But the line was not visible.
Next up was masking. I made a copy of the OwO and changed its colour. I then made a mask of it.

This is what it looked like.
I then selected the mask layer and went to the first keyframe. I selected the brush tool and painted along the line behind the finger, went to the next frame, where the finger had moved, and painted the line behind it, and went on like this for the whole animation.
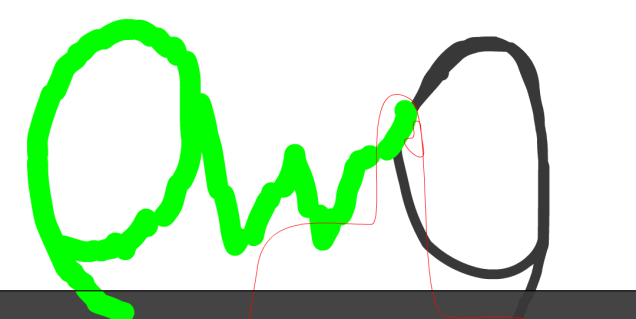
This made sure that the line didn’t appear on screen until after the finger had passed it. This made it look as if the finger was finger painting the OwO on the page.
I then went home, and big surprise, I edited it for several hours.
I’m super happy with how this turned out.
Bouncing Ball Animation
Today I learnt how to make a bouncing ball animation in Adobe Animate.
Instead of being a normal, functioning human being, I decided to make it more complicated, so instead of it taking me an hour at most, it ended up taking me around 5 hours. Yay me…
I started off by making my ball, stairs and background in Adobe Illustrator, and imported it into Animate.

I then made the stairs and ball into symbols.
I proceeded to make a keyframe on the stairs symbol, then one at 20 frames, with the stairs positioned further down, threw a Classic Motion Tween in, and a painful amount of time later I had a flight of stairs that moved up, which made it look like the camera was moving down. This is what it looked like.

I then made the head symbol into another symbol, so that I had two head symbols. One would be for the movement, and one would be for the rotation.

I started with the rotation. I used the same technique as I did with the clock animation. I made four evenly spaced keyframes, with the head rotated 90º on each, and added Classic Motion Tweens between each of ’em.

Just realised they kinda look like ._. faces. Ain’t that cute.
made a keyframe at the start, and then slapped a Motion Tween on it. I made sure to make it a motion tween, not a classic motion tween because they do very different things. A classic motion tween interpolates the frames between keyframes and a motion tween lets you control and manipulate a symbol’s movement path.

I then dragged my little head guy to the position I fancied, and it automatically created a keyframe at the point on the timeline. It also created a line showing the movement path.

I then raised the points on the line where I wanted the ball to jump
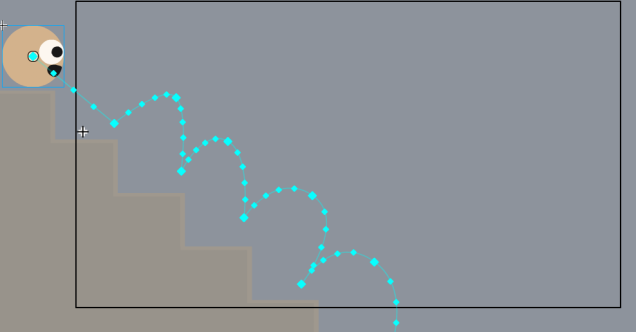
And made the lines curved by clicking them with this tool selected.

This is what the timeline looked like.

But Adobe Animate was being really annoying and wasn’t complying, by making the ball fly in big infuriating ovals up and down the stairs randomly. I fought with it for several hours, but it wasn’t going to work anytime soon. So instead I simply made the ball jump up and down on the same step a couple of times. Combined with the stairs moving up, this gave it the same effect of bouncing down the stairs but was a lot simpler. So yay!

So with that palaver out of the way, I moved onto the final stretch. At each point that the ball hit the stair, I flattened it and made a keyframe. Then when it was in the air, I made a keyframe and set it back to its original size.
I now had an animation where a rolling head bounced down a flight of stairs. I went home and began editing it. I copied and pasted it a couple of times, added some nice fade transitions, downloaded a bunch of free sounds and carefully placed them by hand at the right places and tada!
One really interesting thing I learnt from doing the editing, in particular, was that you can effectively imply action without actually showing it. Like in the finished video, you can hear the head tripping and falling down the stairs, but it is only a black screen. It makes you imagine the action, and the effect is still the same, whether I animated it or not. I also used this technique in the end. I feel like this is going to prove to be a really useful trick in the coming months.
And without further ado, here’s the finished animation. I’m completely pooped.
Clock Animation Task
Today I learnt how to animate a clock’s hands spinning around, with Adobe Animate.
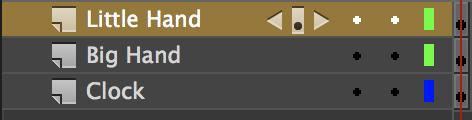
First of all, I made a clock in Adobe Illustrator and imported it into Animate, making sure to separate the different parts into their own layers.
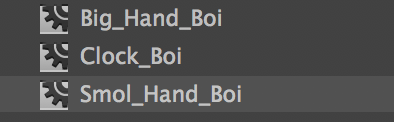
I then made each of them into a symbol. Symbols seem to be pretty similar to compositions in Adobe After Effects, as in they let you animate specific parts of something, which you can then watch in the main Scene window.

This is what they looked like as symbols, in the library window.
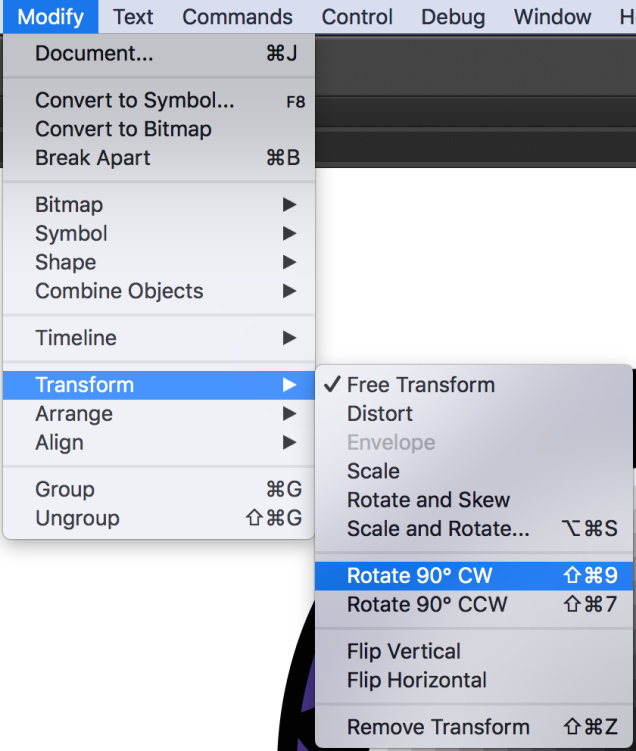
I then used this tool.

To move the pivot points of the two clock hands into the middle of the clock, so that when I begin rotating them, they won’t have a fit and fly around, but instead will rotate around the centre of the clock, like the good little hands that they are. A pivot point is represented by that little white dot.

I then made a keyframe with on the small hand, and went forward 2-3 frames and made another keyframe. On this keyframe, I rotated the hand 90º clockwise, then I went on to do this four times.
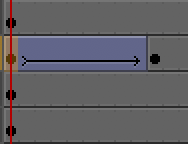
Doing this makes sure the minute hand will rotate 1/4 of the clock for each keyframe. I then Made a Classic Motion Tween between each of the four frames. A motion tween basically fills in the gaps between frames, which saves a great amount of time and mental torture.
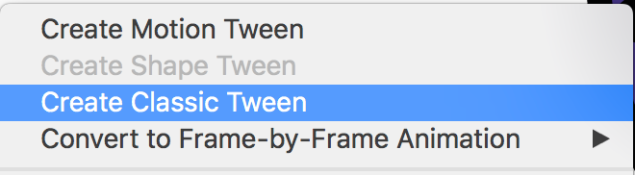
A Classic Motion Tween looks like this.
So now I had one full rotation of the minute hand. But I also wanted the hour hand to move somewhat realistically, so I started by making 12 keyframes on it, which were spaced at the points on the timeline when the minute hand passed 12. On each of the keyframes, I positioned the hand on a number, in a linear fashion. Then I put Classic Motion Tweens between each of them. This ensured that whenever the minute hand did a full rotation, the hour hand would shift one hour. I then copied and pasted the keyframes of the minute hand’s full rotation 11 times, spaced directly after one another. This meant that although fast, the movement of the clock hands would look realistic. This was what all of that put together looked like.

So that was the clock accounted for. It should have been done, but me being me, I wanted to add a background. So I made a fancy swirl and imported it into Animate. I tried using the same technique to back it swirl, but for some dumb reason it wouldn’t work, So I had to make it into a symbol, then make a keyframe, move it a bit, make another keyframe, move it a bit more, and so on. This technique of animation is referred to as animating on ones. The result looked like this.

After that, I was satisfied with it, so exported it.
I then went home and edited it to make it real fancy and show-offy. This is the final product. Yay!
