3D Spaceship Animation

We were given the task of modelling a spaceship from one single cube in Autodesk Maya.  So, knowing me, after a couple of hours of messing around, I created a spaceship, that if actually spotted flying around the skies in real life, would cause bystanders to think they had eaten too many strange-looking mushrooms.

I now present to you

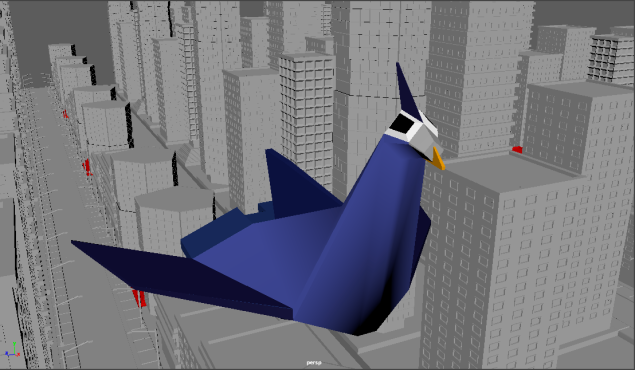
THE PIGEON-MOTHER-SHIP.

Screen Shot 2019-09-24 at 12.37.21Screen Shot 2019-09-24 at 12.37.29

Modelling


Unfortunately I whilst I was crafting this glorious monstrosity, I was so immersed in it that I forgot to take screenshots of my progress, so this is basically how I made her.

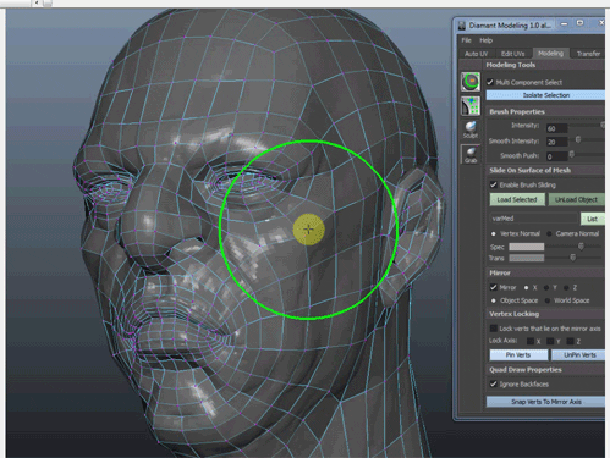
I selected the face option, then used the extrude tool to make everything you see that is sticking out in some way.

Screen Shot 2019-10-01 at 13.24.12

Screen Shot 2019-10-01 at 13.24.24

To make the freakishly long neck, I extruded the front of the then-plain-and-boring-ship and used the move tool to move it up, and the rest is history.

Screen Shot 2019-10-01 at 13.41.20.png

I used the scale tool to change the size of the wings.

Screen Shot 2019-10-01 at 13.51.21.png

And then these are all of the materials I assigned to different parts of my cursed creation to give it colour.  The material lambert basically means that it is not matte, it’s not shiny, then Blin means that it is shiny and reflective.  I renamed the lamberts so that I knew what I was looking at, but I guess that I forgot to rename the Blins… oh well.

Screen Shot 2019-10-01 at 13.42.17.png


Animation


Once we had created our masterpieces, we were given a whole 3D city to mess around in, and given the task of animating a 10-second sequence of the ship flying around.

Screen Shot 2019-09-24 at 13.16.53.png

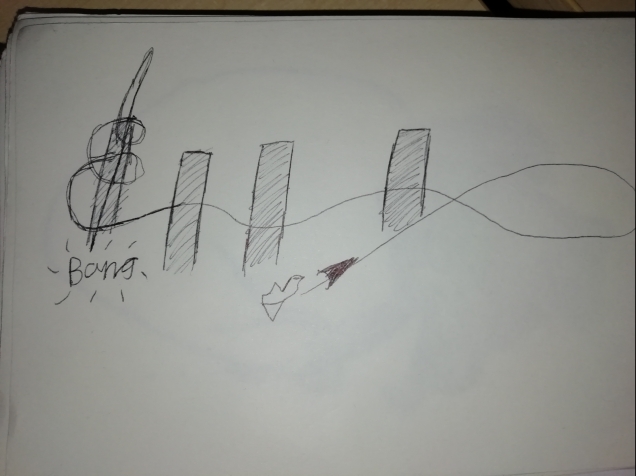
I decided that I wanted to make the technologically-enhanced-pigeon to use a road like a run-way, then take off and swerve between the skyscrapers, then fly high into the sky, and fall back down to earth and crash into a building, then try and make some kind of explosion.  I soon realised that I had planned a lot of stuff that would be hard to realistically animate, but I continued anyway.

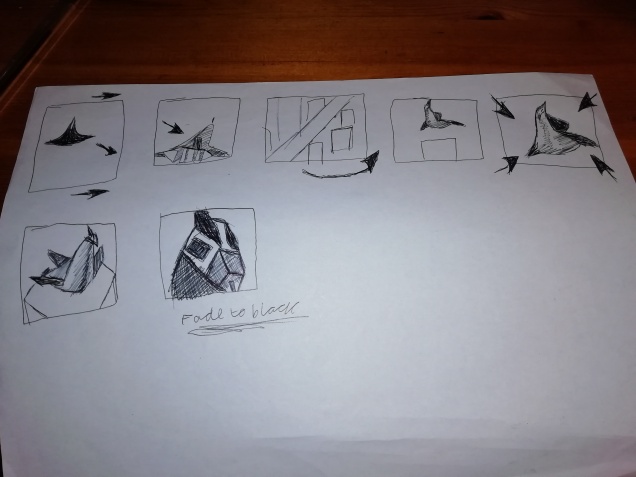
I drew out a very simplified version of my idea.

img_20191001_141145.jpg

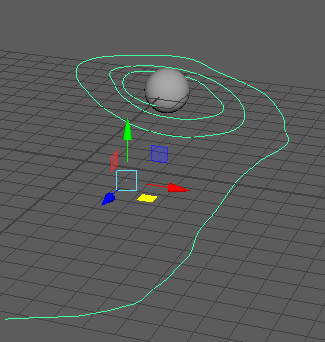
So I placed my majestic ship on one of the many roads and set a keyframe by recklessly pressing the “S” key (sorry Kieran), then moved the ship along the road on the X-axis, and made a keyframe.

Screen Shot 2019-10-01 at 13.58.27.png

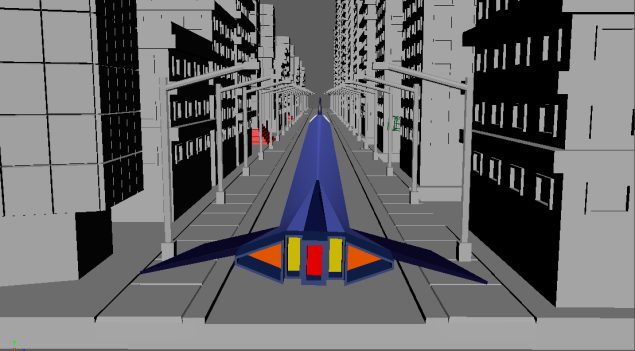
 Then I moved the ship to the end of the road, and on the Y-axis, lifted her up into the sky, and made yet another keyframe.

Screen Shot 2019-10-01 at 14.21.36.png

I then continued moving the mechanical pigeon in the general plan that I drew out, setting keyframes at mostly regular intervals of 20 frames.  These are all the keyframes of the general outline of the animation.

Screen Shot 2019-10-01 at 14.24.49.png

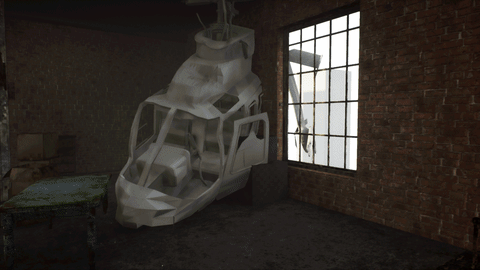
It was at this point that I realised that I had not only been disobeying the brief (making a spaceship take off and fly around, instead of just making it land), but I had also made plans for a way too ambitious animation than my current skillset, and the allotted time allows for.  So, I’m just going to make a simple animation of the spaceship coming in for a landing on the top of a building.  I started by making the spaceship come in for a simple landing, and made it wobble, trying to make it look more realistic.  I tried to find a reference video of a spaceship landing, but I couldn’t.  I then storyboarded the shots that I wanted.

IMG_20191110_182941.jpg

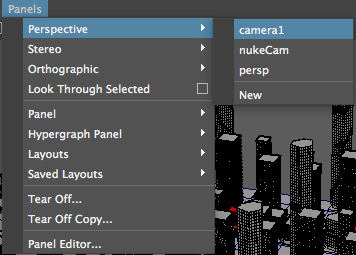
I separated the shots into different cameras, then made them and placed them where I wanted them.  This is them in the outliner.

Screen Shot 2019-11-11 at 10.39.35.png

I followed Kieran’s video about how to render a scene in Maya.  youtube.com/watch?v=ojRK62M8QvM&feature=emb_logo

I went through this process 3 times, one for each of the cameras.

I then put all the shots in Premiere

Screen Shot 2019-11-12 at 12.38.14.png

Then I edited them to make the shots flow better together, and added sounds to make it more enjoyable.

This is the final result!

Maya Cameras (Unfinished)

To create a camera, go to Create, then Cameras, then Camera, like so.

Screen Shot 2019-09-30 at 10.38.12.png

Cameras allow you to make use of shot types in a 3D environment, so that you can have multiple shots and angles of the action, just like a live-action film.

To view what the camera is seeing, then do this.

Screen Shot 2019-09-30 at 10.41.25.png

Either Film Gate or Resolution Gate should always be on.

Screen Shot 2019-09-30 at 10.42.50.png

You can create whats called a parent-child relationship between the camera and the object that you’re focusing on.  This also works for any objects, it doesn’t need to be a camera.  Whatever you do to the parent is automatically done to the child, but you can change the child independently.  To do this, select what you want to be the children; you can select as many children as you want.  Then shift-click what you want to be the parent, then do the following.

Screen Shot 2019-09-30 at 10.50.29.png

You can draw out a path for the camera to follow, by selecting the tool on the right with the little pencil symbol.

Screen Shot 2019-09-30 at 11.20.23.png

Then you can make whatever crazy path you want (don’t do what I did if you don’t want to throw up with motion sickness).

Screen Shot 2019-09-30 at 11.21.26.png


3D Animation Pipeline

For major animations made by big companies such as Pixar and Disney, there needs to be a production line of people with different jobs; this is known as a “pipeline”.

But the pipeline relies on everyone doing their jobs right, because if one small error occurs and gets passed down to the next department, then this will clog the metaphorical pipe. For example, if a modeller accidentally gives a model an extra finger, then it gets passed down through a couple of departments before anyone realises the mistake, it could potentially take a lot of effort to fix.

The schedule is very important to make sure that everything runs smoothly. It is very carefully planned out to make sure that people’s deadlines for their projects work together, and then consequently the finished animation is released on time.

It is also good for the people who are in the pipeline to be aware of some of the other job roles around them, as they could make decisions in their work which would make the job of the next person a lot easier, like making models that have good topology will make animating them way easier.

And now, here are the main job roles in the animation pipeline.

Story

Some stories might come from comic books, books, films, history, personal experiences and so on.


Directors

Directors are responsible for the whole upkeep of the production, they have to keep the whole crew on track and doing everything right.  Directors start with the script.


Editorial

Then the storyboards are created from the script.  After that, the Lead Editor makes an animatic, can be made to show the directors, producers and studio executives so that they can see how all the shots fit together.  It is basically a rough blueprint of the final film.


Art

Visual development artists create the characters, props and environments of a film before it is made, and then they show everything to the director, to see if they fit the film that they want to make.


Modelling

The modellers receive the concept art from the art department, then using that create all the environments, characters, props and pretty much everything you see in the finished film.  They do this using 3D application software, like Blender, Autodesk 3DS Max, Autodesk Maya and ZBrush and so on.


Rigging

The character models are then given to the riggers, who make the skeleton, and all of the joints, muscle, and fat (or weighting) of the character.  This is in preparation for the actual animation of the character models.


Surfacing Department

The surfacing artists are responsible for basically putting the textures on these models, like wood, glass, dirt or whatnot.  They add all of the surface details to the models.


Rough Layout

This process is essentially taking all of the work that has been made so far, like the models, and create a rough version of the film in a 3D space, using motion capture artists to act out the scenes, like the characters, and visual cinematography.


Final Layout

This department makes all of the low-quality detail into high-quality detail.  They make stereo passes, which make sure that the audience’s eyes follow the right parts of the scene.  They also do set dressing, which is basically decorating the environment of the scenes – this is like mise-en-scene in film.


Animation

The modern 3D animators use the CG puppet models that the modellers created.  They give the models controllers so that people can make the characters make different expressions, move different limbs and whatnot.  The number of controls of a typical 3D model for a film is about 6000.

For the animators to actually animate, they need a real-life reference for the movements.  They get these reference videos from a number of sources, and these include the internet or filming themselves acting out the movements.  They eventually build up their own reference library for each character.


Crowds

This department is responsible for creating large numbers of digital extras to a scene.  They create a small number of different background characters and animations.  They then use an artificial computer brain to assign the animations to these characters.


Character Effects (Character FX)

this department basically makes anything that the characters interact with, like hair dynamics, fur; and now the environment and objects visually react when the characters interact with them.


Effects (FX)

This department creates all the effects, like rain, fire, snow, explosions, sparks, particles and so on.


Matte Painting

This department basically makes the backgrounds, like mountains, cloudy skies, cityscapes etc.


Lighting

They take all of the 3D work and add computer-generated lights to make everything look good and realistic in a 3D space.


Image Finalising

These beautiful people take the almost finished film, and go in and clean up any imperfections in the film, for example deleting any unwanted, pesky pimples on a character.


Sound Design

A Composer will write music to heighten and enhance the story.

this department also adds all of the sounds and EQ them, normalise them, and makes everything sound right and play at the right times.


Marketing

Marketing is the penultimate stage of the pipeline. The wonderful people in marketing are responsible for releasing trailers, teaser posters, posters etc. They basically advertise the animation and ignite the hype.


Distribution

This is the last leg of the pipeline. If the animation is going to be shown in cinemas, then these people are responsible for sending it to the cinemas, and wherever else it needs to go.


Research